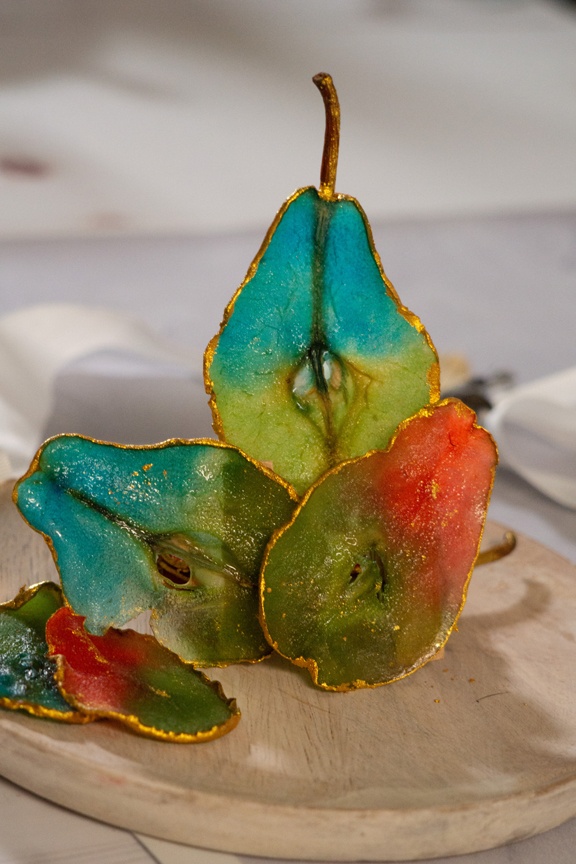
Candied Pears are a beautiful and completely edible decoration for cakes, cupcakes, or any other creative baking project. These stained glass candied pears would make a beautiful window in a gingerbread house!
I first saw candied pears that were beautifully painted, surrounding a cake on the Instagram account @tortikannuchka . I loved the fact that this was a completely edible decoration for cakes and other projects.
Unfortunately, they don’t share their technique online so I began searching for a way to make these beautiful candied pears.
I found several techniques but most of them took anywhere from 12 hours up to several days. I knew there had to be a better, faster way to do this! So I started playing around in the kitchen.
Many, many test batches later, and more pears than I can count, I figured out a way to make them with an even better result.
The pears I had seen on Instagram were almost velvety. The color was flat and, even though they were gorgeous, my technique had created pears that were done in less than an hour and look like stained glass windows!
I imagined a million different ways that I could use these pears as edible decorations for cakes, cupcakes, gingerbread structures, and more!
Audition Cake for the Great American Baking Show using Candied Pears
The first time that I made these pears to use on a cake was for an audition for the Great American Baking Show. I was not cast that season but I tried again and made the show. I knew these pears had to make an appearance on the show!


The cake was a Pear and Carrot Spice Cake that I still love to this day. The roses were handmade by me out of homemade marshmallow fondant. The cake was described by the culinary producer and the chef conducting interviews as ‘perfectly spiced and with enough fruit but still not dense’. I was elated by the feedback!
Then they asked how in the world I created those pears! I briefly described the technique but have never shared a detailed look at how to create them. Below is a video showing you exactly how to make them as well as written directions. Please leave a comment if you have any questions about this technique and I will answer as soon as possible!
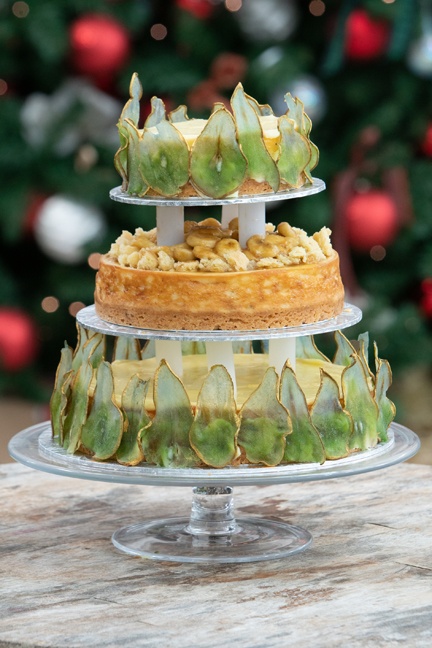
When I was cast for the Great American Baking Show for Season 5 in 2019, I knew that I had to work these pears into one of the bakes. The cheesecake tower seemed like the perfect chance. I made two layers of Pear and Ginger Cheesecake topped with Lemon Ganache and surround those layers with Stained Glass Candied Pears.
The middle layer was a Banana Cheesecake with Ginger crust, topped with Caramelized Bananas.

Sherry Yard said that I ‘elevated cheesecake above any other that she had seen or eaten’ and Paul Hollywood said my ‘creation was stunning and delicious and belonged in a museum as a work of art should be.’
Happy dance!!!
How to Make Candied Pears
Luckily, Candied Pears that look like Stained Glass are easy to make! Just watch the video above to see the steps.
The steps to create these candied pears are simple:
- Make a simple syrup.
2. Slice your firm pears thinly.
3. Simmer the pears until semi-translucent.
4. Paint the pears with gel coloring mixed with some simple syrup.
5. Bake for 20 minutes at 300F.
6. Paint clear simple syrup on each pear slice, flip, and paint the other side.
7. Bake for 10 minutes.
8. Repeat two more times. (May require more baking if the slices are thick.)
9. Shape if desired and paint the edges with gold for extra flair!
What Type of Pears are Best to Use
When making these candied pears, keep in mind that you will want firm pears that keep their shape, even when cooked in a simple syrup.
I have used Bartlett Pears in this video but have also used Bosc Pears in the past. Both have worked well.
When filming the Great American Baking Show in London, the fruit that was available had very different textures than the fruit in the US when I had practiced this bake. So before filming this challenge, I bought EVERY VARIETY of pears available at the store and tested them to make sure that they held their shape! I ended up using Bosc pears on the show.
How To Slice Pears Perfectly
You can either use a mandolin or a sharp knife to slice your pears. Mandolins should give you very even slices but I have always preferred to slice the pears with a knife. I find it easier to control the thickness this way.
Your pear slices should be thin enough to allow you to vaguely see through the pears. About 1/8th of an inch is perfect.
If you have some slices that are not perfect, use them anyway! The thinner edges will curl slightly as the pear bake and makes each slice unique!
How do You Color Candied Stanied Glass Pears
The best way to color the pears is to use gel food coloring that is mixed with a little bit of the simple syrup. Paint the color on with a paintbrush that is only used for food.
If you want your pears to be all one color, you can add the gel coloring directly into the pot when you are simmering the pears. Each slice will absorb the color evenly.
If you want to use more than one color, use the painting method in the video. I love to use green and blue together!


How to Use Candied Pears
These candied pears can be used as an edible decoration for cakes, cupcakes, or as windows in a gingerbread house!
If they are colored green, you can use them next to fondant or gum paste flowers. The candied pears will resemble leaves next to the flowers!
Simply setting a candied pear into the buttercream on top of a cake or cupcake is an elegant and edible decoration! These pears taste like fruit snacks so eat them up!
Use the pears all the way around a cake, either one layer or several. Overlapping the pears slightly and using various sizes makes your cake a masterpiece!
You will need a lot of candied pear slices to cover an entire cake. The cheesecake tower above has 28 slices between the two layers. I generally get about 5 or 6 useable slices out of one pear so I used about 6 pears to surround the cheesecake.

Let’s be Social!
Follow me and Tag me on Instagram @globalbakesbytanya with pictures of your creations!
Follow me on Facebook at https://www.facebook.com/globalbakes
and on YouTube at https://www.youtube.com/globalbakes
Did you know that I have a Patreon??
I love this creators’ platform that allows people to support creators of all types with small monthly contributions! My patron’s small monthly donations allow me to buy ingredients and continue to develop and test recipes and techniques that I share with you! In return, my patrons have access to exclusive content from me!
Check it out at https://www.patreon.com/globalbakes

Candied Pears That Look Like Stained Glass | Edible Decoration for Cakes
Ingredients
- Bartlett or Bosc Pears the number depends on your project
- 2 cups water
- 2 cups granulated sugar
- Gel Food Coloring
Instructions
- Preheat the oven to 300°F/152°C.
- Mix 480 mL water and 400 grams of granulated sugar in a saucepan. Thinly slice at least 3 pears all the way across so that you have a cross-section of an entire pear.
- When the sugar is dissolved in the water on the stove, stir and add the pears to the simple syrup. Simmer for 6 – 8 minutes or until you can almost see through the pears. Remove from simple syrup with tongs and lay flat on parchment paper or silpat lined baking sheet.
- Mix about 2 tablespoons of simple syrup in a small cup with 2 drops of gel coloring of your choice. Prepare one bowl for each color you wish to use.
- Using a small clean paintbrush, lightly paint each pear slice as desired. Mottle colors a bit on each slice if using more than one color. Dap with a paper towel to remove excess moisture. Flip slices over and paint on the other side. Dap again with paper towel.
- Bake the pears for 20 minutes, paint on some clear simple syrup, turn the slices over, and paint the other side. Bake another 10 minutes and then repeat. Thicker slices will take longer. I generally do one 20 minute bake and three 10 minute bakes, coating in between with simple syrup.
- Remove from the oven and shape immediately if you do not want flat slices. Paint the edges with gold luster dust, if desired.


I can’t wait to make these! How long can these be stored after you make them?
I hope you love them! I have kept them in an airtight container for up to two weeks but they do get soft. As long as you are OK with them being soft, they keep well!
Thank you for your response. I’m planning on using them to decorate a Latvian honey cake for Christmas and it’s good to know I won’t need to work on them the day before!
Latvian Honey Cake sounds amazing and these pears will great on it!
Absolutely gorgeous!
Thank you so much!
Loved this post. I made these pears for a cake about a year ago. The method I used was way more time consuming, so I’ll keep your method in mind next time I use this technique. Thank for you a clear and concise tutorial.
I’m so glad that its helpful!
what a great post, Tanya! I promise you I will give this a try once things calm down a bit…